Multi-Depth Soil Moisture Sensor Overview
The Coda multi-depth soil moisture sensor system is a cost-effective and scalable way to monitor soil. It works well with a free cloud platform. This helps to manage crops better.
By placing installation points smartly on your farm, you can easily check field conditions. Coda makes soil sensors that can measure at different depths. They also provide support to customize these sensors for various farming needs.
Key Features of the Multi-Depth Soil Sensor:
1.The sensor has a strong shell made of PVC plastic. It uses detection waves that are high-frequency and close to 1 GHz. These waves can go through the pipe to sense soil conditions accurately.
2.The multi-layer sensor is not affected by salt ions in the soil. This ensures accurate measurements, even when doing farming tasks like fertilizing, spraying pesticides, and watering.
3. Sensors do not touch the soil directly. This helps stop electrical interference with the soil and plants.
4. The sensor uses the Modbus-RTU 485 communication method. It can send messages over distances of up to 2000 meters.
5. Works with a voltage range of 10 to 30 volts for more flexibility.

Applications:
The PVC material keeps the sensor safe from salt, fertilizers, pesticides, and water. It also protects the circuitry. And it is good for checking soil moisture, drought conditions, and watching the weather. It helps save water, improve farming, and track rainfall patterns.
Technical Specifications:
– **Power Supply:** 10-30VDC
– **Operating Temperature:** -40℃ to 80℃
– **Measuring Range:**
– Soil Moisture: 0–100%
– Soil Temperature: -15℃ to 35℃
– **Accuracy:**
– Soil Moisture: ±5% (@50%, 25℃)
– Soil Temperature: ±0.5℃ (25℃)
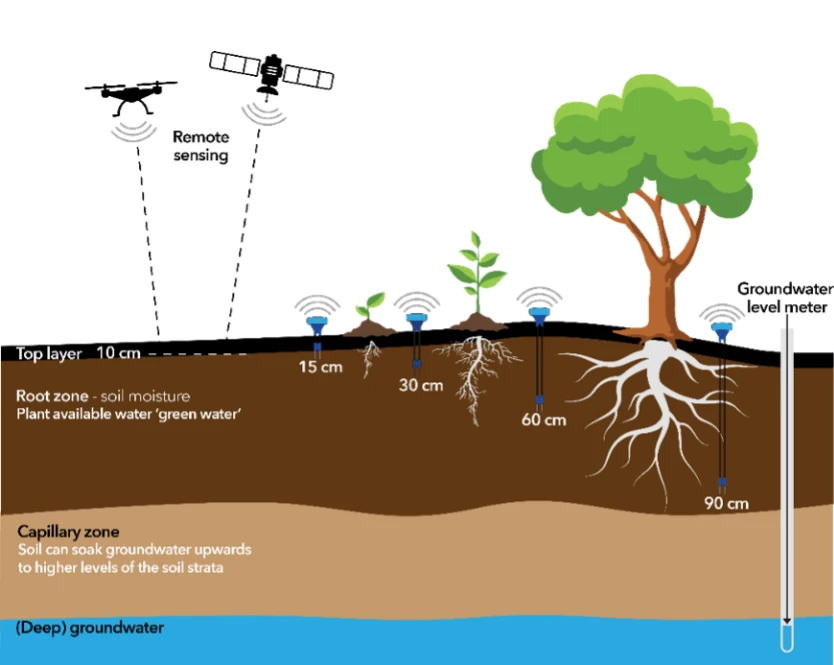
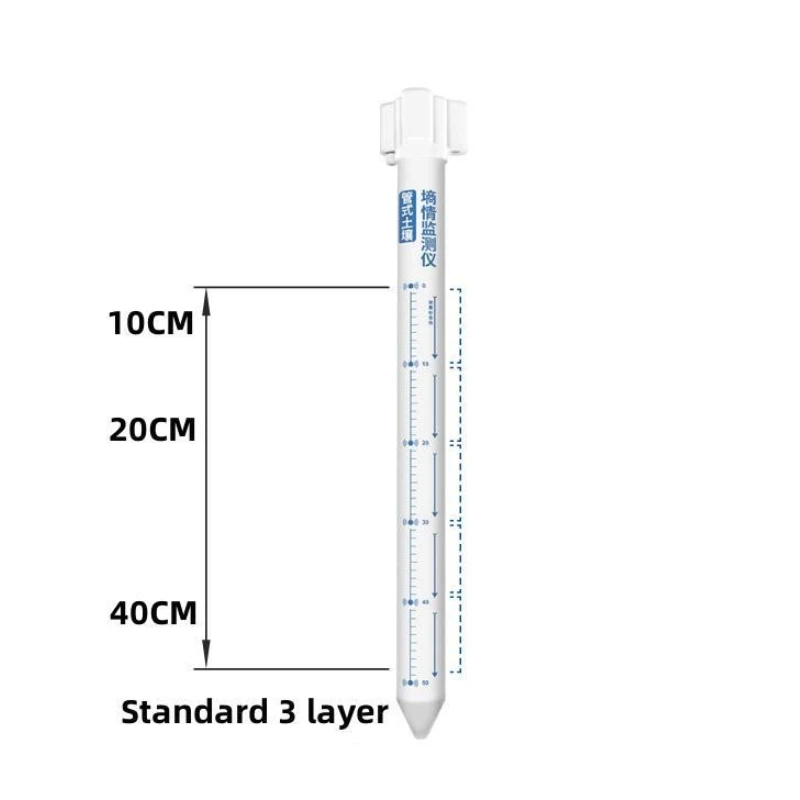
– **Measuring Point Spacing:** 10 cm
– **Shell Material:** PVC plastic pipe
– **Protection Level:** IP68
– **Output Signal:** RS485 (Modbus Protocol)
Installation Guidelines for Multi-Depth Soil Sensors:
**Choosing the Right Installation Location:**
1. Put sensors in place after planting crops to prevent disturbances.
2. Opt for flat areas for proper placement.
3. When using full irrigation, focus on areas with less water. For partial irrigation, choose humid zones to monitor.
4. Choose places with even crop growth to show a true picture of most crops.
5. Place sensors near the water-absorbing roots. This helps keep track of how well crops are growing.
6. Stay away from low areas where rainwater can collect. This helps stop short circuits or issues with equipment.
**Step-by-Step Installation Process:**
**Step 1: Drilling Holes Using Soil Drills**
1. Hold the soil drill straight up with both hands. Press down gently and turn it to the right. Do not use too much force. This will help you stay precise and keep the drill aligned.
2. Collect soil in a bucket to prepare mud. Do not use the soil from the first drilling. It is not clean.
3. Drill again while checking the sensor fit. Carefully put it into the hole. Do not push it all the way down.
If you need to, use the drill to change how deep the hole is. Check that it matches the position marked on the sensor.
**Step 2: Preparing Mud**
1. Remove things like stones, roots, or clumps from the soil. Then, gently rub the soil to help make the mud.
2. Add water slowly while stirring. Keep mixing until you have a thick texture like “sesame paste.” Make sure to mix it well before you finish making the mud.
**Step 3: Grouting Installation**
1. Slowly pour the mud into the hole. Fill it until it is about half full. Change this amount based on the specific conditions of the installation.
2. Slowly insert the sensor into the hole. Gently rotate it in one direction while pressing down.
“Don’t go too fast. This will help make sure all air bubbles are removed.” (Important: Do not lift the sensor while inserting it, as this can let air back into the cavity.)
3.When the sensor gets to the right depth, extra mud may spill around the equipment. This shows that grouting is done. At this stage, the sensor should be flush with the hole opening.
(Important: Be sure to remove mud that is more than 3 cm around the sensor. This will help prevent buildup that can block moisture from getting in.)
**Step 4: Final Installation**
Once you plug in the device to the power cord and the 485 communication line, it will beep. This beep shows that the device is on and ready to use. It is best to wait until the mud settles before starting normal operations.
**Additional Considerations:**
**Installation in Sandy Soil**
The steps for installing in sandy soil are the same as those for loam. You should pay close attention to how you use water. Prepare no less than 5 liters of water prior to grouting.
Pour water into the hole. This will soak the walls well. Keep adding water until it pools at the bottom.
Add mud slowly to fill about half of the hole. All next steps follow the guidelines for loam installations.
**Clay Installation Guidelines**
For clay installations: After you drill the hole and clean it, gather the clay. Soak the clay in water for at least four hours. This will soften it and make a smooth slurry.
After soaking, mix the clay until it becomes thick and sticky. Then, you can start grouting. The rest of the installation process is like loam installations.