FAQs on Moisture Sensors
Knowing about soil moisture and why it matters is important in farming. Soil moisture is the water found in the soil. It is very important for helping plants survive and grow.
This moisture acts as a solvent. It dissolves inorganic nutrients in the soil. This allows plants to absorb them through their roots.
Good management of soil moisture is important for crop growth. Plants need different amounts of water, salt, and soil temperature to grow well. This can come from rain or irrigation. Soil moisture sensors are one of the best tools for checking soil moisture.
Overview of Soil Moisture Sensors and Their Role in Agriculture
Soil moisture sensors are important tools in farming. They help farmers know how much water is in the soil. This information is important for growing healthy crops.
These sensors check how wet the soil is. They can tell if the soil is too dry or too wet. This helps farmers know when to water their plants.
Using soil moisture sensors can save water. Farmers can avoid overwatering, which is good for the environment. It also helps reduce costs for water and energy.
In addition, these sensors can improve crop yields. When plants get the right amount of water, they grow better. This leads to more food for everyone.
Soil moisture sensors are very important in today’s farming. They help farmers make better decisions and use resources wisely.
Soil moisture sensors are well-known tools in farming. They help check water levels in the soil. However, questions often come up when choosing, installing, or using these devices well. Here are answers to common questions about soil moisture sensors.
Common Questions About Soil Moisture Sensors
1. How Do Soil Moisture Sensors Work?
There are two common types of soil moisture sensors: TDR sensors and FDR sensors.
– **FDR Soil Moisture Sensors:**
FDR sensors work based on electromagnetic principles. They measure the soil’s dielectric constant (ε) by looking at the frequency of electromagnetic waves that pass through it.
This data is used to find the volumetric water content (θv). The FDR system is good for checking soil moisture all the time. However, accurate calibration is important for reliable results.
– **TDR Soil Moisture Sensors:**
TDR sensors quickly find out how wet the soil is. They send signals through a transmission line that does not match. The reflected waveforms show how much moisture is present.
TDR sensors usually respond in 10 to 20 seconds. This makes them good for mobile measurements and fixed-point monitoring.
2. What Are the Output Options for Soil Moisture Sensors?
Different soil moisture sensors offer different output options. This depends on their power sources and communication methods.
– Sensors powered by a 4.5–30V DC supply often use RS485 Modbus protocol for data output.
– Sensors with a 10–30V DC supply can deliver signals like 4–20mA, 0–5V, or 0–10V analog outputs.
– Battery-powered devices (e.g., 3.6V lithium battery) may offer wireless outputs, such as LoRa signals.
3. How Can Soil Moisture Sensors Be Calibrated?
Calibration makes sure sensor readings are accurate. It works best when you compare the sensor’s data to a trusted reference tool. This should be done in real humidity conditions. Some approaches include:
– Measuring relative humidity between 50–90%, typically during summer evenings and nights.
– Using places like bathrooms with constant water spray can help create higher humidity levels.
– Using a central heating chamber to create humidity levels below 50%. Electric heaters can change indoor humidity levels. They can keep humidity at 60% when it’s 20°C. They can also lower it to 30% when it’s 32°C.
Recommended tools for calibration are psychrometers and dew point meters. They give accurate readings of relative humidity and temperature.
Soil moisture sensors are essential tools in modern farming. They help farmers manage water use and improve crop growth in different conditions.
4. Installing an Automatic Soil Moisture Sensor
To install an automatic soil moisture sensor, first choose a good spot for it. Consider your soil type and the area you want to monitor. Follow these steps:
1. “Remove any debris or rocks from the installation site. This will help ensure accurate readings.”
2. Insert the sensor probes into the soil. Place them either vertically or horizontally, as the user manual says. Make sure they are at the right depth.
3. Connect any extra parts, like a data logger or wireless module, if needed.
4. Check the setup by testing the sensor with the recommended tools. This will make sure it is ready to capture real-time data.
5. Reading a TDR Soil Moisture Sensor
Our TDR soil moisture sensor has two ways to read data. This makes it good for different uses.
1. **Using a Soil Moisture Sensor Data Logger**:
This portable solution lets users carry the logger easily. They can connect it to the sensor and see real-time soil moisture readings.
Our special soil moisture data logger (RS-TRREC-N01-1) shows real-time data. It also stores and exports information for later analysis. This option is great for users testing in different locations.
2. **Using a Free Cloud Platform**:
Users can upload sensor data. This is helpful for those who check fixed measurement sites or manage multiple measurement points. They can do this on our free cloud platform.
This allows you to view data in real-time on computers or mobile devices. It makes long-term tracking and analysis easier.
6. Choosing the Best Soil Moisture Sensor
There are different types of soil moisture sensors. They use various methods to measure moisture. These methods include Time Domain Reflectometry (TDR), Frequency Domain Reflectometry (FDR), Infrared Remote Sensing, Capacitance, Resistance, Microwave, and Neutron Scattering, among others.
TDR and FDR sensors are the most accurate and commonly used in agriculture. They are known for their reliability and precision.
The best options are the FDR soil moisture sensor and the TDR soil moisture sensor. Each one has different uses based on what the user needs.
7. What Does a Soil Sensor Measure?
A soil moisture sensor measures the water content in soil. By checking humidity levels, users can understand soil moisture. This information helps with irrigation planning and improving crop health. Soil moisture is important for soil aeration, nutrient breakdown, microbial activity, and overall crop growth.
Different types of sensors exist, like handheld, digital, and wireless smart sensors. Each type meets different needs. Fixed-point sensors are good for long-term monitoring. Portable units work better for measuring moisture in many places.
Applications: Great for greenhouses, farms, or monitoring individual crops.
8. Coverage Area of Soil Moisture Sensors
The area a sensor covers depends on how it is designed and what features it has. Most sensors can monitor areas from 1 to 2 acres. Some advanced models can cover larger areas.
Sensors work by detecting resistance, neutron values, or soil properties. They then adjust measurements based on these factors.
Weather conditions and local temperatures can affect coverage. For local measurements, a standard probe length of 7 cm gives data from a cylinder-shaped area about 7 cm wide around the probes.
9. Types of Data from Soil Moisture Sensors
Common electromagnetic soil moisture sensors use capacitance or reflectometry. This includes Frequency Domain Reflectance (FDR) and Time Domain Reflectance (TDR).
These sensors measure the amount of water in soil indirectly. They do this by looking at the soil’s dielectric properties and electrical features.
10. Tips for Extending Soil Moisture Sensor Longevity
To keep your soil moisture sensor working well and lasting longer:
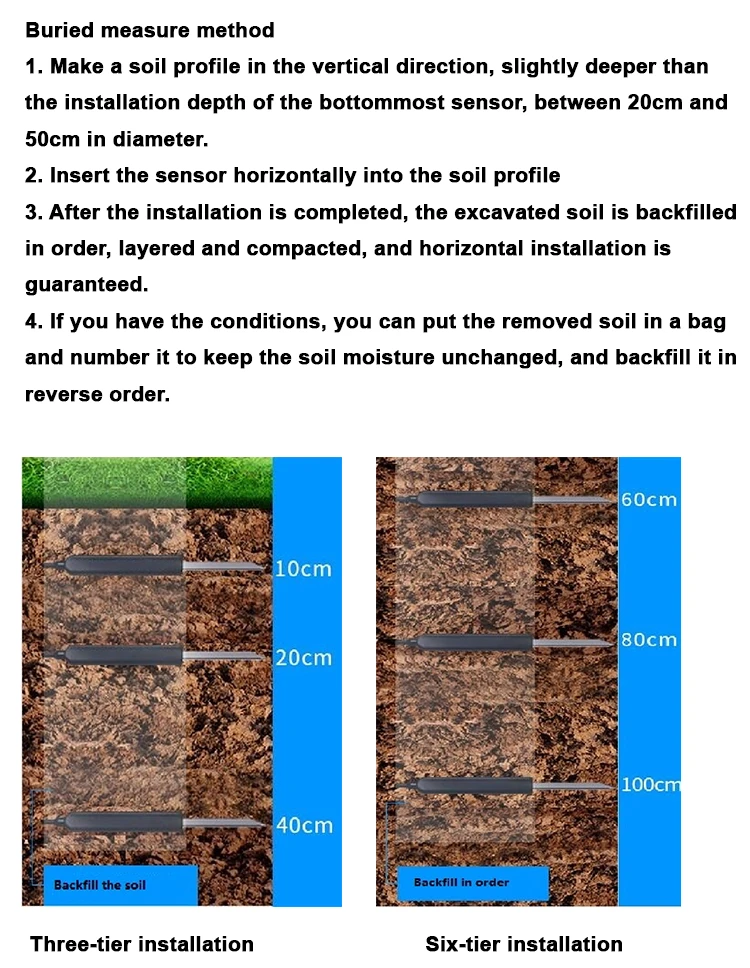
1. **Vertical Insertion**:
Place the sensor straight into the soil. Do not shake it to prevent bending or damaging the probes.
2. **Horizontal Arrangement**:
For multi-layer detection applications, place multiple sensors horizontally in parallel without disturbance during insertion.
3. **Avoid Obstructions**:
If you find lumps or foreign objects in the soil, move the sensor or remove the obstructions before continuing.
4. **Proper Storage**:
After use, clean the stainless steel probes with a dry paper towel. Store the sensor in a dry place. Keep the temperature between 0°C and 60°C. Use foam covers to protect the sensitive parts from damage or wear.
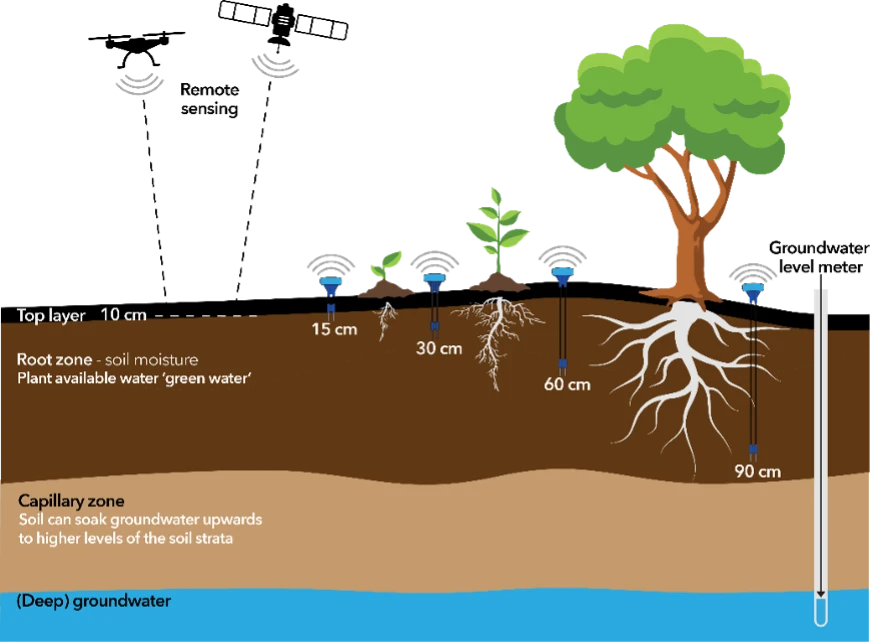
11. Depth of soil in relation to soil moisture sensors
Soil moisture levels change at different depths. This makes depth an important factor in sensor readings. A soil moisture sensor can be placed in the ground at a certain depth. It measures water content to meet the needs of the plant and soil type.
For example, trees in dry or hilly areas can have roots that go as deep as 12 meters. In contrast, vegetable roots usually reach about 1 meter deep. For regular crops, the best depth to measure water is usually 5 to 9 cm.
12. Measuring field capacity using a soil moisture sensor
Soil moisture sensors are being used more in automated irrigation systems. Multiple sensors can be placed in a field to monitor soil moisture levels. The user uses an irrigation platform to set moisture level parameters.
When the sensor data goes below a set level, the system starts irrigation. It does this by sending a signal to open the water valve. If the readings go above the maximum moisture level, the system closes the valve.
This allows for automated irrigation. It helps use water efficiently and keeps crops properly hydrated.
13. Installation cost of soil moisture sensors
Installing soil moisture sensors is an easy process. You do not need professional help, which saves money on labor. Costs depend on several factors. These factors include the size of the area, the number of sensors needed, and how well they work with data collectors.
Sensor placement, like cable lengths, also matters. You might need extra controllers for more advanced automation tasks. Clarifying these factors upfront allows for accurate estimation of installation expenditures.
14. Resource-saving benefits of soil moisture sensors
Soil moisture sensors are placed in the soil near roots. They help automatic irrigation systems save water. This modern method lets users manage irrigation from afar.
You can do it from your desk while drinking coffee. It helps control moisture levels without needing to go out in bad weather.
These sensors cost about $35. They work well within a range of 20 meters. Under normal conditions, they can last over three years. This offers significant savings.
15. Preventing saturation using soil moisture sensors
The soil moisture sensor works by measuring electrical resistance between two electrodes. When moisture is higher, resistance goes down. This is because water conducts electricity better.
However, do not immerse the sensor in liquids. These sensors are designed to measure soil water content. They are not for liquids used in plant solutions.
16. Operational details of capacitive soil moisture sensors
A capacitive soil moisture sensor works with a special capacitor made of polymer. This sensor has a conversion circuit and a microcontroller for processing measurements and sending data remotely. The polymer’s dielectric constant changes with humidity, which affects capacitance values.
These values usually range from 48 to 56 pF. The conversion circuit changes capacitance into voltage. This shows humidity levels from 0% to 100% relative humidity (RH). The output is linear and goes from 0 to 1 volt.
How to Choose the Best Soil Moisture Sensor Device
1. **Durability and Weatherproof Features**:
Since soil moisture sensors are typically used outdoors, they should be designed with stringent waterproof and dustproof standards. Look for devices with an IP68 rating. This rating means they resist water and corrosion. This helps the sensor last longer and work better.
2. **Probe Material**:
The probe plays a critical role in accurate soil measurement. Choose probes made of austenitic 316 stainless steel.
This material is rust-proof and does not conduct electricity. It resists salt and alkali corrosion. It also works well in different soil types.
3. **Sensor Chip Quality**:
The sensor chip is important for accurate data processing. Chips with good MCU operational amplifiers offer energy efficiency, better sensitivity, and stable signal transmission. This improves overall performance.
4. **Airtight Construction**:
To stop moisture from getting in, use high-density epoxy resin vacuum sealing between the probe and body. This creates a strong seal for stable operation in wet or changing environments.
5. **Measurement Techniques**:
– For long-term monitoring, make sure the values you measure after irrigation or rain match the real soil moisture levels.
– If you are doing quick tests, water the soil well before measuring. Let the water soak in completely.
– On hard surfaces, drill a hole that is a bit smaller than the probe’s diameter. Next, insert the probe and compact the soil around it. Finally, take your measurement.
6. **Selection Based on Needs**:
The type of sensor you choose should match your specific requirements:
– For basic soil moisture monitoring, opt for cost-efficient sensors.
– To measure temperature and moisture at various depths, go for multi-layer or multi-depth sensors.
– For checking nutrients in orchard soil, choose a soil NPK sensor or a 7-in-1 soil sensor.
– For pH level analysis, pick a soil pH sensor.
– Professional gardeners can use soil moisture data loggers and other tools. These include soil tensiometers and NPK testers.
Application of Soil NPK Sensors and Testers
To test soil fertility, we use special sensors. These sensors measure NPK (nitrogen, phosphorus, and potassium levels), pH, and moisture content. They give accurate readings. This helps make better choices in farming or gardening.
How to Maintain a Soil Moisture Sensor
1. **Proper Usage of Probe**:
Always fully insert the stainless steel probe into the soil, avoiding contact with rocks to prevent damage to the steel needle.
2. **Housing Care**:
The sensor housing is often covered with black epoxy resin. It should be kept away from direct sunlight and high temperatures. Additionally, field use requires proper lightning protection.
3. **Handle with Caution**:
Do not drop or hit the sensor or probe when you install or store it. This can impact how accurate and durable it is. Also, keep signal wires away from places with too much heat or humidity.
4. **Cleaning After Use**:
After use, clean the probe well. Clean off any dirt or moisture. This will help keep it accurate and make it last longer.
Choosing and taking care of soil moisture sensors is important. This ensures they work well and last a long time. These sensors help in farming, gardening, and checking the environment.