Soil Moisture Sensor Installation and Lifespan |soil moisture meter
Soil moisture sensors are important tools for checking how much water is in the soil. These devices work by measuring the dielectric constant of the soil. This measurement is closely linked to the amount of moisture in the soil. By looking at the dielectric properties found by the sensor, we can accurately determine the soil’s moisture content.
Lifespan of Soil Moisture Sensors
The durability and lifespan of a soil moisture sensor depend on a few key factors:
1. **Sensor Quality*
Sensors made from good materials are stronger. They can work in hard conditions, which helps them last longer.
2. **Environmental Factors**
Different environmental conditions, like climate, temperature changes, humidity, and plant soil type, greatly affect how long sensors last. For example, extreme temperature changes can speed up the degradation process.
3. **Installation and Maintenance**
Proper installation and regular maintenance are key to making a sensor last longer.
4. **Usage Frequency**
Using a sensor often can make it wear out faster than one that is used less.
Soil moisture meter typically last for 3 to 5 years. High-quality models that are installed and maintained well can last more than five years.

Installation of Soil Moisture Sensors
To get good data from a soil moisture sensor, you need to install it correctly. Here are the main steps you need to follow:
1. **Choosing the Right Location**
To get good results, place the sensor in a spot that shows the soil moisture levels of your target area. Steer clear of upland zones, drainage ditches, or low-lying regions that may not provide a balanced measurement.
2. **Calibrating the Sensor**
Before you install the sensor, make sure to calibrate it. This will make sure its readings are accurate.
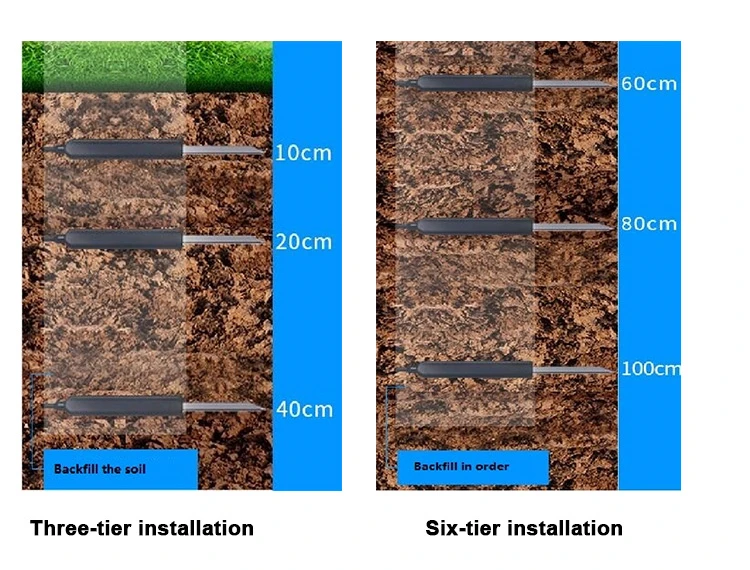
3. **Preparing the Soil**
Dig a hole that is the right size for the sensor. Make sure it is deep enough. Make sure it has good contact with the soil.
4. **Placing the Sensor**
Install the sensor according to the manufacturer’s instructions. Make sure it is fully embedded and in good contact with the soil around it.
5. **Providing Protection**
Use protective covers or sleeves to keep the sensor safe from harm. This keeps it safe from physical damage and environmental factors.
6. **Connecting Cables**
Connect the sensor’s output to a data acquisition system or logger. This will help collect and analyze data.
7. **Conducting Tests**
Post-installation testing is important. It helps to make sure the sensor easy to read are correct.
Maintaining Soil Moisture Sensors
To keep things reliable and accurate for a long time, regular maintenance is very important. Key maintenance practices are:
– Check the sensor and all connections often for any damage.
– Make sure the protective covers are in good shape and working well.
– Recalibrate the sensor if the results do not match the expected ranges.
– Clear any debris or blockages around the sensor. This helps keep good contact between the soil and the device.
To keep your soil measure moisture sensor working well, follow the correct installation steps. Also, do regular maintenance. This allows your sensor to give accurate readings for a long time.