Introduction: Feel the Wind, Read the Numbers
Have you ever stood on a hill, watching a weather vane spin lazily as the wind shifts, and wondered how meteorologists turn that simple motion into precise data? That motion is captured by a device called a wind vane anemometer. It’s the unsung hero behind everything from local weather forecasts to wind farm site assessments and even smart home HVAC systems. In this guide, we’ll demystify wind vane anemometers—explore how they work, why you need one, how to pick the right model, and how to keep it humming accurately for years. By the end, you’ll be ready to install, calibrate, and read wind data like a pro.
1. What Is a Wind Vane Anemometer?
The Anatomy of a Wind Sensor
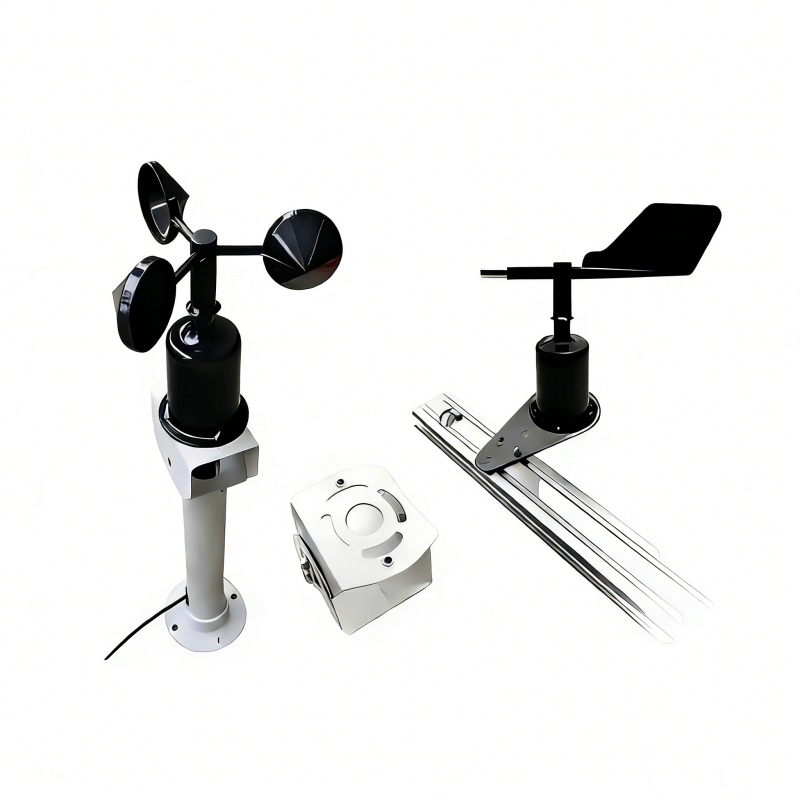
A wind vane anemometer is a two‑component system:
1. Wind Vane (Direction Sensor) – A lightweight, rotating element that aligns itself with the wind direction. The vane’s orientation is typically measured by a potentiometer or a magnetic encoder.
2. Cup or Propeller Anemometer (Speed Sensor) – Three or four cups (or a propeller) that spin as wind passes. The rotation rate is proportional to wind speed.
These components are mounted on a single shaft, often with a vertical pole, and powered either by a small internal battery or by a solar panel. The device outputs analog voltage signals or digital data via RS‑485, USB, or wireless protocols, which are then fed into weather stations, data loggers, or cloud platforms.
How It Works in Practice
When wind flows, it pushes on the cups, causing them to rotate. The faster the wind, the faster the rotation. A sensor converts this rotational speed into a voltage or frequency signal. Simultaneously, the wind vane rotates to face the wind, and its angle is measured to determine direction. Combining both readings gives a full picture of wind conditions: speed (mph or m/s) and direction (degrees or cardinal points).
—
2. Why You Need a Wind Vane Anemometer
1. Accurate Weather Forecasting
Meteorologists rely on real‑time wind data to model atmospheric conditions. Even a slight error in wind speed or direction can skew temperature and precipitation predictions. A calibrated wind vane anemometer ensures high‑quality inputs for both local forecasts and satellite‑based models.
2. Renewable Energy Planning
Wind farms need detailed wind profiles to select optimal turbine locations. Engineers use anemometer data to calculate wind power density, estimate annual energy production, and perform feasibility studies. The cost of a wind farm can be significantly reduced by choosing sites with the best wind resources.
3. Agriculture & Irrigation
Wind speed and direction affect evapotranspiration rates, pesticide drift, and crop stress. Farmers use wind data to schedule irrigation, apply chemicals safely, and monitor micro‑climate conditions for precision agriculture.
4. Aviation & Maritime Safety
Pilots and ship captains depend on accurate wind measurements for navigation, take‑off calculations, and storm avoidance. Wind vane anemometers integrated into weather radar systems help maintain safe operations in volatile environments.
5. Smart Home & HVAC Efficiency
Homeowners installing smart HVAC systems can use wind data to adjust ventilation, reduce energy consumption, and improve indoor air quality. For example, a smart thermostat might increase airflow during high‑speed breezes to prevent overheating.
—
3. Choosing the Right Wind Vane Anemometer
1. Identify Your Use Case
| Use Case | Ideal Anemometer Type | Key Features |
|———-|———————–|————–|
| Home Weather Station | Compact, USB or Bluetooth | Low power, easy installation, Wi‑Fi connectivity |
| Wind Farm Site Survey | High‑accuracy, 3‑D anemometer | Temperature compensation, high sampling rate |
| Agricultural Monitoring | Robust, weather‑proof, 24/7 | Low maintenance, data logging, low drift |
| Industrial HVAC | Digital, programmable output | Secure data transmission, low latency |
2. Accuracy & Range
- Accuracy: Look for ±2 % of reading or better. Some models offer ±0.5 % for high‑precision applications.
- Range: Typical range is 0–60 mph (0–27 m/s). If you need to measure gusts up to 100 mph, choose a model with extended range.
3. Environmental Durability
- IP Rating: For outdoor use, aim for IP65 or higher. This ensures protection against dust and water jets.
- Temperature Range: Many sensors operate from –20 °C to +50 °C. For extreme climates, choose a model with broader limits.
4. Power Options
- Battery‑Powered: Ideal for remote sites. Check battery life (often 2–3 years).
- Solar‑Powered: Combines battery backup with renewable energy.
- Hard‑wired: For fixed installations with constant power supply.
5. Connectivity & Data Output
- Analog (0–5 V): Easy integration with legacy systems.
- Digital (RS‑485, CAN, BLE, Wi‑Fi): Modern, low‑power, and secure.
- Cloud Integration: Some models push data directly to cloud platforms (e.g., AWS, Azure) via LTE or 5G.
6. Calibration & Maintenance
- Factory Calibration: Most units come pre‑calibrated. Verify with a calibration certificate.
- Ease of Calibration: Models with a calibration port or software allow quick re‑calibration.
- Maintenance Needs: Check for parts that require periodic replacement (e.g., cups, bearings).
—
4. Installing & Setting Up Your Anemometer for Accurate Readings
1. Site Selection
- Clear Horizon: Avoid obstructions within 10–15 m of the sensor to prevent turbulence.
- Stable Ground: Mount on a rigid pole or mast. Use a tripod or concrete footing for stability.
- Wind Tower Height: For accurate readings, install at least 10 m above ground level, but 10–15 m is common for residential units.
2. Mounting Procedure
1. Poles & Anchors: Secure the pole to a concrete base. Use guy wires if necessary.
2. Sensor Alignment: Level the sensor horizontally. Many units come with a built‑in level.
3. Electrical Connections: Connect power, data, and ground wires. Use weatherproof connectors.
4. Enclosure: If the sensor is not fully weather‑proof, install a protective housing to shield it from precipitation and debris.
3. Calibration Check
- Initial Calibration: Use the manufacturer’s calibration kit or a calibrated reference anemometer. Compare readings at known wind speeds (e.g., using a wind tunnel or a calibrated anemometer).
- Zeroing: Ensure the device registers zero wind speed when stationary. Adjust as needed.
4. Software Setup
- Drivers & Firmware: Install the latest firmware. Many devices have OTA (over‑the‑air) updates.
- Data Logging: Set up sampling intervals (e.g., 1 s, 5 s). For most applications, 1 s is sufficient.
- Alert Configuration: Configure thresholds for high wind speeds or sudden direction changes.
—
5. Maintaining & Calibrating Your Wind Vane Anemometer
1. Routine Inspection
- Visual Check: Inspect for dust, corrosion, or damage. Clean the cups and vane with a soft brush or compressed air.
- Bearing Check: Ensure the shaft rotates freely. If resistance is felt, lubricate with a silicone spray rated for outdoor use.
- Cable Integrity: Look for frayed insulation or loose connections.
2. Calibration Schedule
- Annual Calibration: For most installations, a yearly calibration is sufficient. Use a calibrated reference anemometer or a wind tunnel.
- After Major Events: After storms or high‑gale events, re‑calibrate to account for possible drift.
3. Battery Replacement
- Indicator: Most units have a low‑battery indicator. Replace batteries before the indicator triggers.
- Solar Backup: If using solar power, check the battery’s state of charge and replace after 2–3 years.
4. Firmware Updates
- Security: Keep firmware up to date to patch vulnerabilities.
- Feature Enhancements: Updates may improve data accuracy, add new sensors, or enable remote diagnostics.
—
6. Reading & Using the Data
1. Understanding the Output
| Parameter | Units | Typical Range |
|———–|——-|—————|
| Wind Speed | m/s or mph | 0–30 m/s (0–100 mph) |
| Wind Direction | Degrees or Cardinal | 0–360° |
| Gust Factor | | Usually 1.3–1.5 times the average speed |
| Temperature Compensation | | Adjusts speed for air density changes |
2. Data Analysis Tips
- Moving Average: Smooth short‑term fluctuations with a 5‑minute moving average.
- Gust Detection: Identify peaks that exceed the average by 30 % or more.
- Diurnal Patterns: Plot speed vs. time to see morning/evening wind shifts.
- Correlation with Weather: Overlay wind data with temperature, humidity, and pressure for comprehensive forecasting.
3. Practical Applications
- HVAC Control: Increase ventilation when wind speed exceeds a threshold to reduce indoor temperature.
- Agricultural Spraying: Delay pesticide application if wind speed is above 10 mph to avoid drift.
- Wind Farm Modeling: Feed data into computational fluid dynamics (CFD) simulations to predict turbine performance.
- Safety Alerts: Trigger warnings for high‑speed gusts that could affect structural integrity or aviation.
—
Conclusion: Key Takeaways
1. Wind vane anemometers combine a rotating cup (speed) and a vane (direction) to deliver reliable wind data for a wide range of applications.
2. Choosing the right model depends on your use case, accuracy needs, environmental conditions, and connectivity preferences.
3. Proper installation—including site selection, mounting, and calibration—ensures long‑term accuracy and reduces maintenance.
4. Routine maintenance and calibration keep your sensor accurate, especially after extreme weather events.
5. Interpreting data correctly unlocks actionable insights for weather forecasting, renewable energy, agriculture, aviation, and smart home systems.
With the right wind vane anemometer in place and a solid maintenance routine, you’ll harness the power of the wind—literally—and make smarter, data‑driven decisions in any field that depends on wind. Happy measuring!